2014+ Jeep Cherokee Forums banner

PTU Drain Plug Project….Completed!

2.9K views 23 replies 7 participants last post by  Gary Kline  
#1 ·
I have been trying to find more info on draining and tapping the 2speed PTU housing for a drain plug.
I cannot seem to find anyone that has documented the process, which I find a little strange at this point in the game, given that the build up of sludge inside is probably a large part of the problem.

I don’t do social media, this is about it here on this forum, so maybe someone out there has seen someone document what they have done.
My Only concern at the moment, as long as the spot I’ve seen on a post here is correct is…

.How thick is the case at that location?

I’ve looked into buying a crap PTU and tearing it down, can’t seem to find one reasonably priced.

If I can get the info I need, my plan is to do it over the Christmas break and document it.

Any help would be greatly appreciated.
 
Discussion starter · #4 ·
Thanks Gary, how did you find that video, I’ve been googling every phrase I could come up with and every video is of the Ford PTU drill and tap.

That’s kind of funny, I was thinking of reverse filling as well, thinking it would make the process easier in the end, after seeing the post of how much actual clearance behind the fill plug there was.

I’ll keep checking for more info, but in the end it’s really think it needs to done ……it’s just a hole, the worse that can happen 😬

Stay Tuned
 
Discussion starter · #6 ·
Hey @Flechtight ,

There's actually a bunch of really good Ukrainian and Russian YT channels where they really tear the Cherokee apart and show the insides. For example, one has a complete disassembly of the actual EPS rack which is pretty cool. RDM, PTU, rear knuckle bushings and front balljoints ,CANBUS modules etc. also.

There are especially two good channels:


Go to their channels above, hit the 'Search' magnifying glass and type "Cherokee".

You need to turn English subtitles on and of course you won't understand what's being said, but between what you see and the subtitles, you can see the procedures they used on a lot of in-depth Cherokee things. Eugene's channel's especially good, he's really talented (and as a nod to @sanghill , he also does CrossTrek videos :) )
Thanks Gary, last night I watched the video you posted, and yes very hard to understand, I never found the translate subtitles to English so I sat in front of tv taking screen shots of the Russian subtitles and then translated each one to piece together …. Long night 😅

I reached out to VDL and received a response back from him quick.

I will stay up tonight and watch the other channel you posted.
Need to figure out the translate setting, that would really be helpful.

I would expect this many year’s later, someone local, would have done videos on R&R the RDM or PTU
 
Discussion starter · #8 ·
Thanks Gary. I could not find English for CC on my mobile device but when I followed your steps while watching on the Firestick, English comes up as an option. Go back to mobile and it only allows Russian subtitles.

go figure

I thought the wiring harness extension is a great idea. There should be a way to bench test the units before installing saving time and a little piece of mind.

That stupid little motor takes allot of abuse inside the case , I could see the motor blowing a shift and leading to other major issues.
Thanks again Gary, your working your way up my Christmas list….. but don’t get to excited, my kids never did
 
Discussion starter · #10 ·
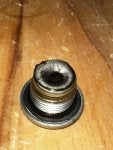
PTU drilled and drained. I did not verify level before drilling, but I got a solid 32oz of oil out. Plug magnet did not look bad, yes shining all throughout but expected for 70,000 + miles.

Image


so before I got to drilling , I had to cut off the hex plug from the casting and polished the surface of the boss for the sealing surface.
Image

Image

Then to make sure the hole is as perpendicular to the polished surface I made a drill guide to mount off one of the heat shield bolts which is running parallel to the drain plug boss (casting)
Image

first drill block was drilled as a pilot hole so I could dip gauge the depth around the hole to see what I had to work with on depth, which gave me about 1/2” for threading.
I also probed the area around the hole and never could touch anything behind the hole.

next was a metal drill guide for a #3 bit for 1/4”-28 tap
Image

Drilled and cleaned out hole with craft pipe cleaners. Tapped hole

Image


Reverse filled….. PTU
Image

This got interesting, I stayed under the car to make sure I did not blow out the fill line going to PTU after over a quart into it and probably a half quart more than I should, no oil was coming out the fill plug.
I decided to stop and wait. 15 minutes later it started dripping out the fill plug and I ended up letting it drip all night and I caught an extra half quart.

so it takes awhile to migrate across the PTU, as thin a viscosity as the oil is ( like water) it does not rush out.
Next time I need a better pump set up and verify and measure in.

Lastly I had ordered bonded o-rings for the flange head bolt but they are late arriving and I needed the car so I went with copper gasket, and ultra black RTV then cap sealed the plug head and let is cure over night.
You do not want a leak at this point
Image


Image
 

Attachments

Discussion starter · #13 ·
If it takes overnight to drain out a half quart from the till port then do you believe pumping in oil from the fill port has enough time to equalize in the case?

Yes, any oil is better than none. I wish I had checked the level before I started, because I do not like to “assume “ it was full from factory.

I do think a fill from bottom up is the way to go on the AD2 PTU but you need to be very confident about your skills here.

I will add that when I pull the plug down the road, I should have put a slight taper on the end of the flange head plug, because when you pull the fill line out of the new plug hole, the oil runs out like waters d a taper would help align the bolt to bore quicker than you can turn 1/4-28 threads trying to align threads as oil runs down your hands.

I liken it to jumping out of a perfectly good airplane, once you make your move, your committed till the end, whatever the outcome.
 
Discussion starter · #16 ·
Nope Been paid off for a couple of years.

I do have the extended warrantee on the PTU becuase of the input spline issue, and to cover this PTU it “must”throw the code for the spline or it’s not covered. So no biggy
 
Discussion starter · #18 ·
great job (y) did you remove the cross memeber skidplate to make a drain plug?
Yes I did and @Garykline had posted the Torque specs for the bolts that I took off a different post.
Note: I was not having any issues with my PTU, this was done more as a preventive maintenance project…. New oil equals less metal particulates, and less magnet FOD for actuator sensors and what machine doesn’t like fresh oil?
 
Discussion starter · #21 ·
I was gonna ask if you were included in the PTU warranty extension or if you had the lifetime Maxcare warranty.
I think it’s cool what you did BUT may be an issue for any warranty claim on it the future.
Before I got rid of my Cherokee I was already having fights with coverage and 2 dealers said that Stellantis/FCA had been making it harder to get things covered and denying coverage on Lifetime warranties. Recently on this forum I have seen others that are being refused coverage for Lifetime Warranties . Again great job on your making it easier to service fluid changes 😎
Hey, Thanks. Yes I am part of the recall, no max care warranty, but at this point I’m not worried about it. More interested in a little piece of mind that I’m trying to keep her happy. 🤞
 
Discussion starter · #23 ·
Excellent!! I was ready to do the same thing…. Just wasn’t sure where to drill. Nice work!
Remember when filling, can’t do it through fill plug, must be done from bottom up and watch out for over filling, it takes forever for oil to get to fill port and spill out.
maybe heating oil will help.