2014+ Jeep Cherokee Forums banner

JDM ASTAR LED 9006 headlights

17K views 37 replies 9 participants last post by  Txmusicman7  
#1 · (Edited)
I found the time to install the new LED's this weekend. These are the JDM ASTAR 9006 bulbs 8th Gen. I wasn't happy with the Xenondepot design, and I hated the black void on the drivers side.

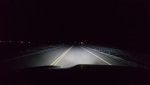
The fog lights are off in all of these pictures.

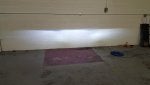
Just for reference, here is the original halogen. (1.jpg)

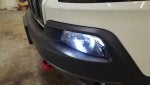
Followed by the Xenon Depot bulbs (2.jpg)

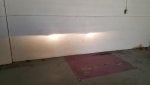
Then these are the JDM's, notice the black void is gone and the cutoff line is cleaner. The key to these lights is the ability to turn the LED's to the 3 and 9 o'clock position. I tried them at 12 and 6, but it was horrible. (3.jpg)

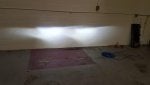
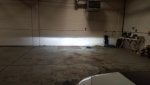
Finally just a picture at a distance from the wall. (4.jpg)

Also, if you order from JDM directly and use the code, JDM ASTAR, you get 8% off. https://www.jdmastar.com/index.php?route=product/product&path=20_426&product_id=295

These bulbs still require the resistors to work, as I expected they would.

One day I'll figure out how to put text between the pictures.
 

Attachments

#3 ·
#7 ·
I don't think they are much brighter than the Xenondepot bulbs, they just don't have the void on the driver side, which was driving me crazy. I'll try and get some shots on the road. The brights are better though.
 
#9 ·
Definitely a big improvement over the stock halogen. I haven't even driven the Jeep for a few days, long days at work hasn't left me much time. I'll get some road pics posted soon.
 
#11 ·
Deputymax, I have a question. I noticed you went with the 9006, any reason in particular ? My mechanic tried installing a xenondepot hid kit but was sent 9006 bulbs and the factory halogens are 9005. Long story short, the kit isn't working as one bulb shuts off and If we can't get it to work, I'm going to pull the trigger on this kit in hopes of replicating your success. Just curious why you went with the 9006 and if I should go with the same or 9005 if I get this kit.
 
This post has been deleted
#14 · (Edited)
correction
Image
Image


9005 are not painted off as 9006 are.
the difference with the 9012/9011 bulbs is these HIR halogens bulbs have a coating on the glass which reflect infrared back into the bulb, these HIR halogens are brighter,more efficient, longer lasting. the 9012/9011 HIR bulbs also cost $30 a pop, while the 9005/9006 halogens are less than $10. On the side of the bulbs it should also list the bulb type and wattage used. Any can be made to fit the socket by modifying the tabs. Hope that helps.
 
#22 ·
Thanks for the help. Got my HID kit in and my mechanic ended up modifying the 9006 bulb to work. I attached a pic to the 9005 bulb that he pulled out. Very strange that some of these 16's are coming out with these bulbs from the factory. An interesting thing I noticed, is the "HL+" letters on the bulb. Perhaps a new High/Low 9005 bulb ?


Good to know ! Thanks !
I went with 9006 because the company doesn't offer a 9012 in that bulb yet. The only difference is one tab size, the 9012's tab is larger. A 9006 will fit in the 9012 socket with no modification. A note of caution though, it is possible to put the 9006 in two different positions. I almost couldn't get the light back out the first time I put it in wrong. Make sure the small tab is in the 3'oclock position and all will be good. Once I figured out which tab went in which slot, it was easy to install and remove to adjust the twist.

I've been working crazy hours the last two weeks, I will get out tonight and take a nighttime shot. IMHO I like the light spread a lot better than the Xenondepot bulbs. I believe the Xenondepot would be better if you could adjust the angle of the LED's. I was shocked to see how much of a difference it made turning the angle of the LED's from the 1 and 7 position of the XD's and the 9 and 3 of the JDM's. I tried them at 12 and 6 and that was absolutely horrible.
 

Attachments

#16 ·
And for reference, here is the difference between 9006 ands 9012. That tab would need to be modified if you were putting a 9012 into a 9006, but not the other way around, as in our case.
 

Attachments

#17 · (Edited)
<snip>

One day I'll figure out how to put text between the pictures.
It can be done by adopting a new technique. Right now, you are *attaching* pictures with the feature at the bottom of the post box. This requires uploading pics from your computer directly. It does not allow you to put anything between attachments, unfortunately...

The other technique, which would allow you to write between pictures, requires you use the "Insert Image" button located just above the post box (where all the bbcode stuff is, like "quote", "Insert Link", etc...).
But to use this function, you need to host your pictures on a pic sharing site like Photobucket. You can open a free account there, easy stuff. You upload your pictures into your Photobucket (or other site) Library, then just "Copy" the image link from Photobucket (you'll see a "Direct link" option to the right of the picture) > click the "Insert Image" button here and then paste the link in that box. Experiment a little and you'll be a Pro in no time. You can now write anywhere you want above or below those image links.

Note : if you plan on using your Photobuket Library for more picture sharing (not just for the forum), be sure to either create separate librairies, or just set your main librairy to private. Setting it to private will restrict access so no one can browse through all your pictures. If you don't set it to Private, anyone can start from a link to one of your pictures and work there way into your Library. When set to Private, others will see the picture from the link you post and that's it, no other access to your Library.
 
#19 ·
I don't mind at all, thanks.

Here is a night time shot with the fog lights off. Notice there is no dark area on the driver side like with the XD's. I don't notice much of a difference between low and high beams though.
 

Attachments

#20 ·
That's a great pic, thanks.

This is just my interpretation based on one pic : nice full beam with no dark/dead spots indeed. Maybe a little wider than the halogens, but not that much ; the narrow beam from the halogens is definitely one of their weak points. The cutoff appears to be sharp, which is very much needed to avoid bleeding up into oncoming eyes.
I'm also seeing a lot of light in the foreground, almost as if you had the fogs lights On (I know they are not) ; the most efficient low beam pattern wold direct more light at the cutoff and less in the foreground, to allow the eyes to see obstacles beyond the cutoff. This is one of the reasons why fog light use is restricted in some countries/states, because they add a bleeding light source and also because they restrict distance vision by forcing the eyes to look into the foreground light.

But I have to say they produce a good beam for LEDs :smile:
 
#21 ·
The cutoff is very distinct even at a distance. Perhaps the cutoff is aimed too high? Maybe if I bring the lights down a smidge it would help. As I said, I don't even notice a difference when I turn on the high beams, so maybe a lot of the light that is meant to be on the road in the distance isn't hitting the road. I'll adjust them a little today and check.

I've never had HID or even projectors, I'm not sure what is normal for the cutoff yet.
 
#23 ·
@Deputymax Everything still going good with the headlights? I just ordered the same pair, as well as LED fog lights and interior from JDM. Hoping all goes well. Also, I saw on the JDM sight that the headlight cooling housing can be adjusted/reversed. Which way do you have it for your instal?
Here is a pic for reference to my question:
 

Attachments

#24 ·
Lights are still working great, I'm very happy with them. It did take a little time to get the turned just right. I left the heatsink in the original position. There was plenty of room between the light and the cap, I didn't see a need to reverse it. The heatsink also has thermal paste on the threads to help conduct from the base to the heatsink. I'm also running them in my Charger, no problems there either.
 
  • Like
Reactions: Duke2015
#26 ·
I mounted the resistors near the battery and the air filter. I didn't take many pictures of the install since the same basic thing had already been covered in other threads. I cut a hole in the cap and ran the wires for the resistors through it, then sealed it with some grommets and "goop" sealer. I was able to fit the little box attached to the lights inside the headlight housing. It was a tight fit, but doable.
 
#30 ·
@Deputymax Could you take a pic of your lights from the front at an angle, specifically I would like to see what your light looks like on the housing. Mine looks like a circle split in two. If I could see how yours are positioned, I could easier replicate that to get the better cutoff you have. I cannot seem to get quite as good of a beam patter as you are getting.
 
#31 ·
Sorry, been away from the forums a few days. I'll try and get a picture tomorrow at the shop. I know the dark area of the half circles are not at 9/3, more like 10/4. It did take me quite a few tries to get it right on the driver side headlight, once I had it right, I took a picture of it and put the passenger side ring in the same place.
 
#33 · (Edited)
I had to take it at an angle to actually see it. It looks like it's more at a 1 and 7 angle, but I remember as I was adjusting them, the light pattern in the projector didn't seem to change much. Anyway, I hope this helps you. Sometimes think it may work better rotated the other way, but I haven't had the time or desire to open it back up and test my theory.
 

Attachments

  • Like
Reactions: Warlin
#36 ·
it is the inherent design of the reflector type led bulbs, see how the light only emits from one side, they still are very bright but casts a shadow from the light bouncing off the plastic back, hopefully one day a manufacturer makes a bulb with the leds on top of the bulb which our projection style headlights need
Yeah, that is was drove me crazy about the Xenondepot version, that dark spot on the lower driver side. I like the JMS's a lot better. I keep waiting for a company to use the same type of design, but have four sides and forward facing LED's as well. LED's are getting brighter and brighter with less power draw, hence less heat. Perhaps someday.

I was surprised to see the 2016 Ford Explorer with LED low beams from the factory. It has a pretty big heat sink on it, but it's all contained inside the headlight bucket.
 
  • Like
Reactions: Duke2015
#38 ·
**Bump for the 2 year update !!*

How are these still working out for you Deputymax ? I’ve had HIDs since and while I like the light output, they’ve been a real PITA since day one and I’m pretty sick of them. Reliability sucks. My passenger headlight goes out every time temps drop below 55F or if it starts raining hard. I’ve switched out bulbs, secured wiring, you name it..and still have the light go out randomly. Strangely enough, the bulb will come back on if I turn the vehicle off completely start it again.

So yeah..I’m itching to switch to LEDs as long as they’re reliable and at least somewhat brighter than the factory halogen.